Groundbreaking! Building the Astro Shed
This post isn’t about astrophotography, but rather a place to do it from. My yard is pretty much out of the question, trees all around, with only a view of the northern sky. You know what else is north? Uptown Charlotte. I was thrilled when I learned that our local astronomy club had an observatory with much darker skies than I have.
GHRO (the Gayle H. Riggsbee Observatory) is about 50 minutes from my house. From the point of deciding to go, to being able to start imaging is a good two hours– transporting the gear to the van, driving, setting up, aligning, re-aligning because I was off 11 ticks. I’m not complaining, it wasn’t like it was a surprise. I knew how far it was. You’d think that coming home it would be easier - but you still have to unpack everything because it is full of dew. The mount, the tripod, telescope (except for the glass, that has a dew heater), even the counterweights. Everything needs to air out to dry off.
<This would be a great place for a picture of dewey gear, darn it!>
Greg, whom I have mentioned before, actually has an observatory built at GHRO. Walk in, open the roof, unpark the scope, start shooting. Greg has set the bar…
Fast forward to November 30, 2018. That was groundbreaking day. I was doing it!
I’m not doing it alone, either - Jim is building one on to the east of Greg’s. Jim and I have both gotten a tremendous amount of help from Dale, a fellow CAAC club member. He brought to the team some experience working with forms and concrete, and, more importantly, a frontloader. When you are in a big field it is pretty hard to gauge how out of level a small part of it is. We picked a spot that looked to be pretty uniform. The back-left (southeast) corner had to come up over a foot to meet the front-right for each of our pads.
Going to Need Some Filler
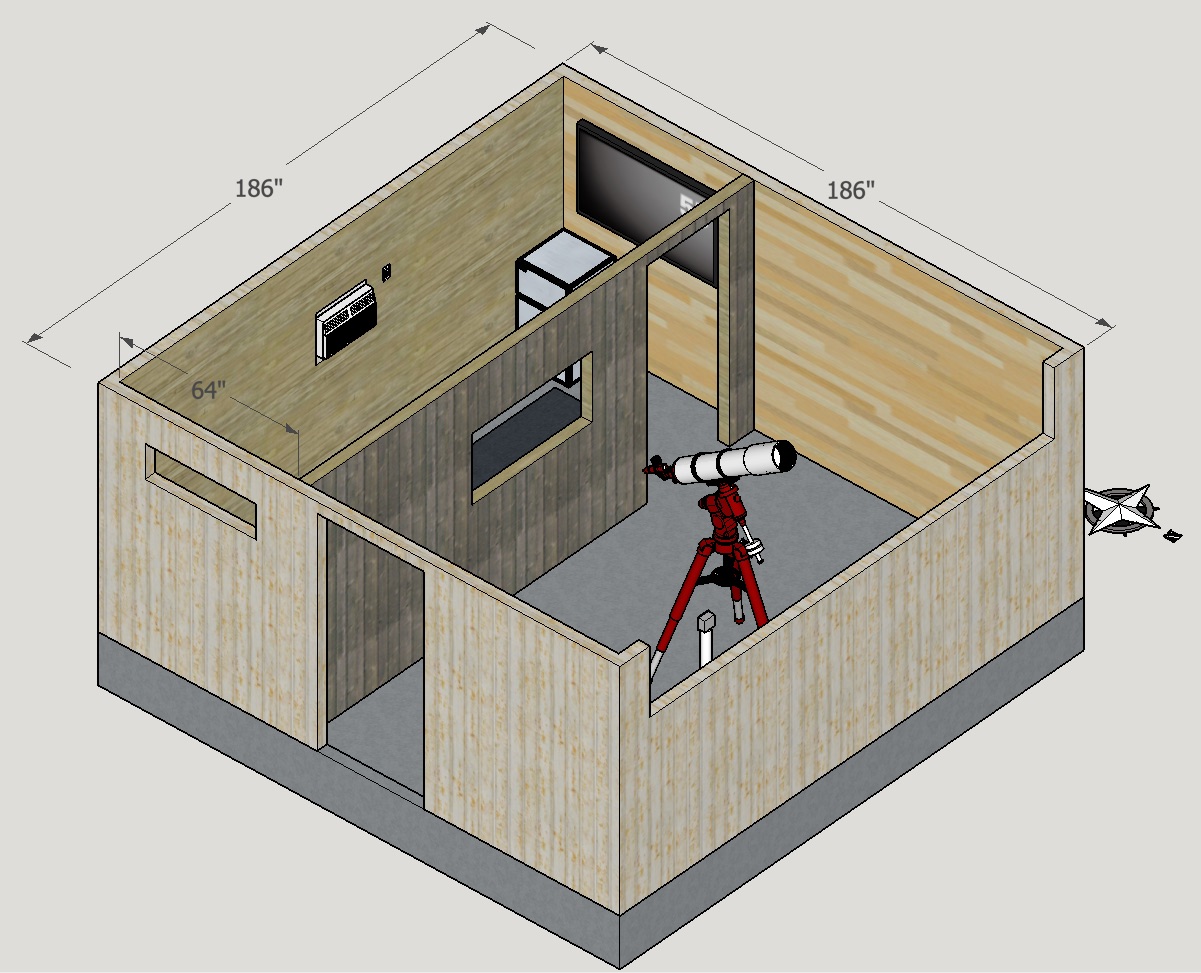
First, some basics. I am building what is called a “CJE Max” (their website isn’t great, but they deserve a plug!). The Sketchup model doesn’t show the doors, but they will be there. I will actually have room for two scopes in there (don’t tell my wife ![]() ) so I have room to grow. This will be a “roll-off roof” observatory, with a warm room. The foundation will be a slab, 15’5” x 15’5”, and about 6’ of that footprint will be the “warm room”. As you can see in the sketch it will have a fold-down wall facing north. Normally this whole thing would be flipped 180°, but due to the way the land works at GHRO we opted for this orientation.
) so I have room to grow. This will be a “roll-off roof” observatory, with a warm room. The foundation will be a slab, 15’5” x 15’5”, and about 6’ of that footprint will be the “warm room”. As you can see in the sketch it will have a fold-down wall facing north. Normally this whole thing would be flipped 180°, but due to the way the land works at GHRO we opted for this orientation.
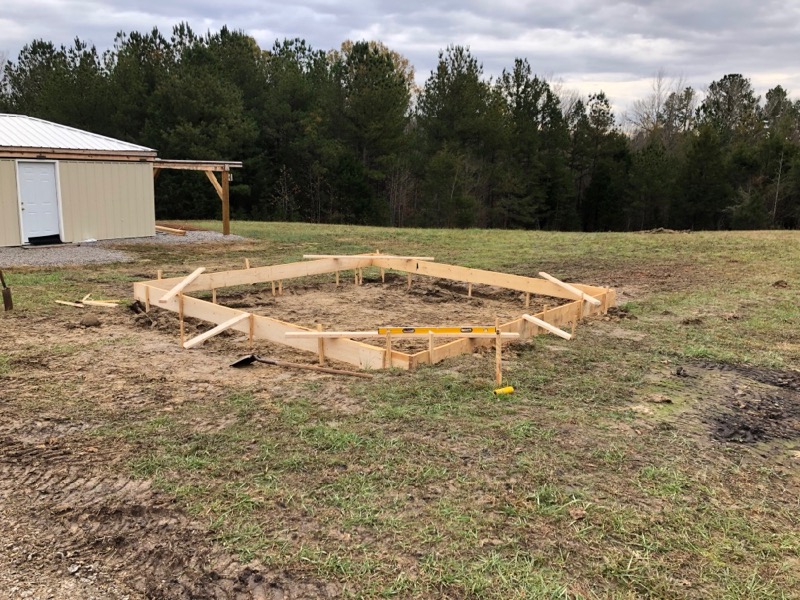
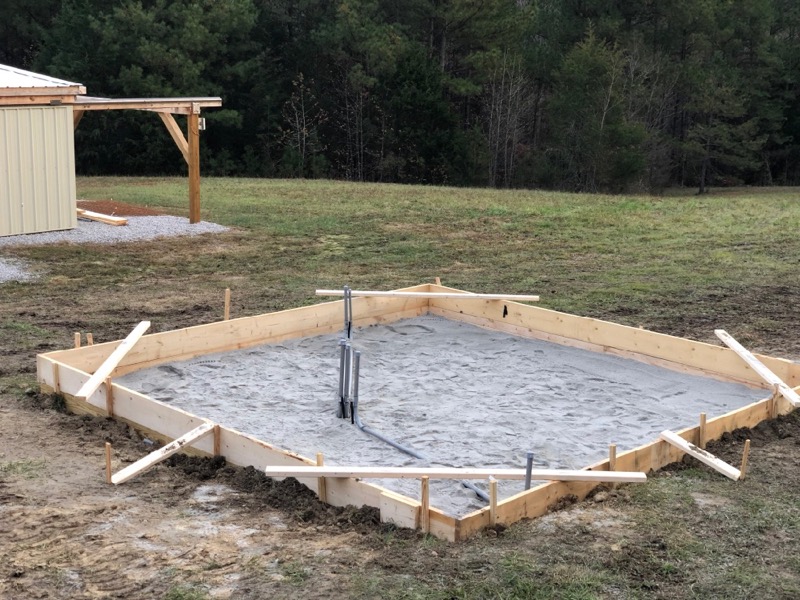
Groundwater in that part of the observatory runs from the northwest to the southeast - so I wanted to make sure that my foundation was at least four inches above grade. This forced us to raise the other corners to match. Those are 2x10s shown on the top - we used another set of 2x10s below, and then some. That would have been a LOT of concrete, so we opted to get some screen fill. After talking with the folks at the quarry, they suggested that we get something called fill-screen, not a powder, but not exactly chunks, either.
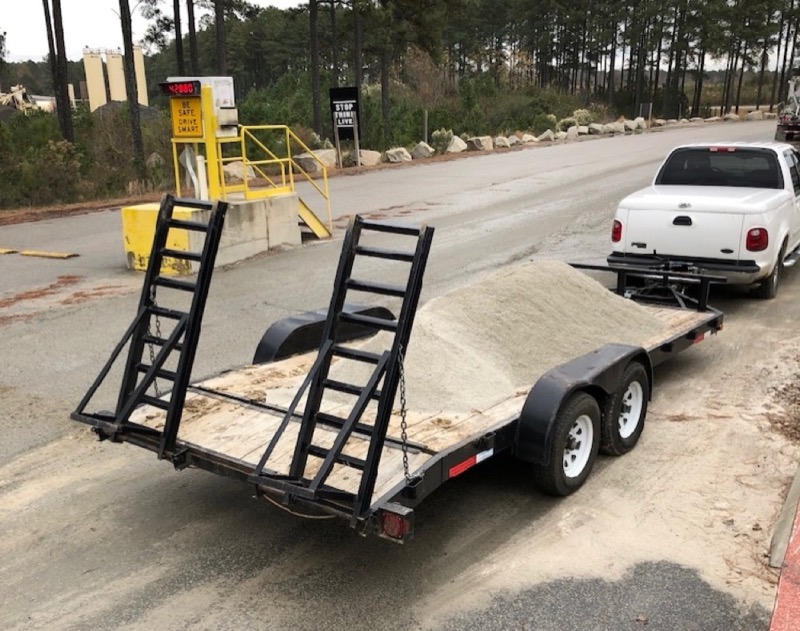
Dale has a flatbed trailer which he uses to cart around his Jonn Deere tractor, and the quarry was only about six miles away. One of the tires on the trailer was a bit low on air, but luckily Jim had a compressor with him and topped it off. We headed out to the quarry to get a load. Two tons set me back a whopping $25. We headed back to GHRO, and Dale, Jim, and I proceeded to use a mix of manual and John-Deere-assisted labor to spread it out. The first batch didn’t do a whole lot, so we went back for another two tons.
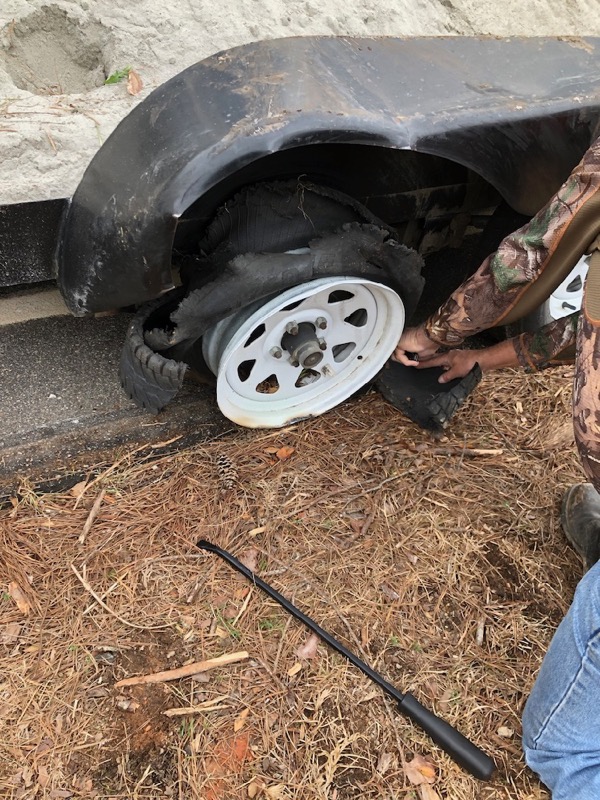
Unfortunately, on the way back we ran into a little trouble– a blown tire. Strangely, it wasn’t the tire that was low on air, but the other side of the trailer! We limped along a bit at about 4 mph, tread flapping around, until it got caught in the wheel well ![]() . A sharp knife, a pry bar, and some elbow grease got the tread off so we could move on our way.
. A sharp knife, a pry bar, and some elbow grease got the tread off so we could move on our way.
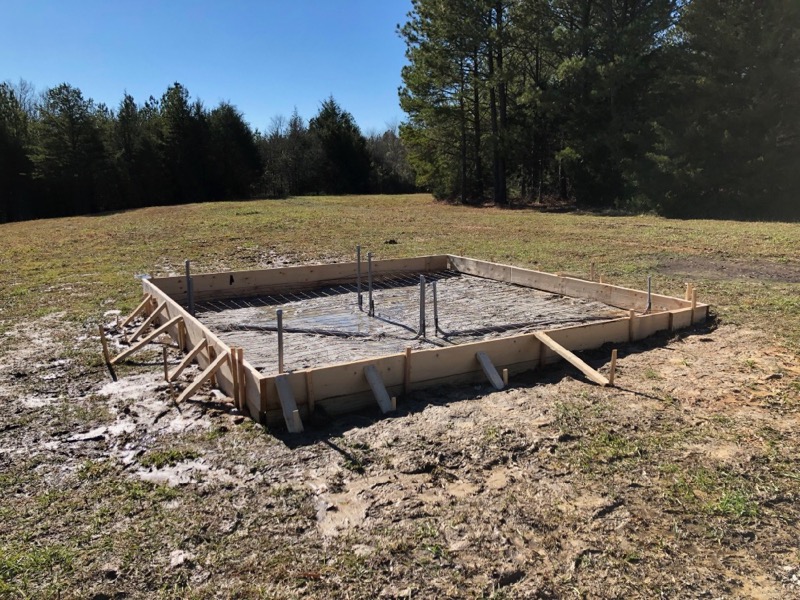
It was a very productive (albeit exhausting) day – we started with four stakes and dirt, ended up with forms, conduit for wiring, gravel, and ~3 feet of vulcanized rubber.
Will it ever stop raining?
We get our share of rain in the Carolinas, but November and December 2018 were ridiculous. It rained every weekend. The first decent day was this past Sunday, December 16th. We don’t have an exact date of when they folks from Backyard Observatories will be here, so we need to be ready sooner rather than later, and there was plenty more to do. I headed out bright and early.
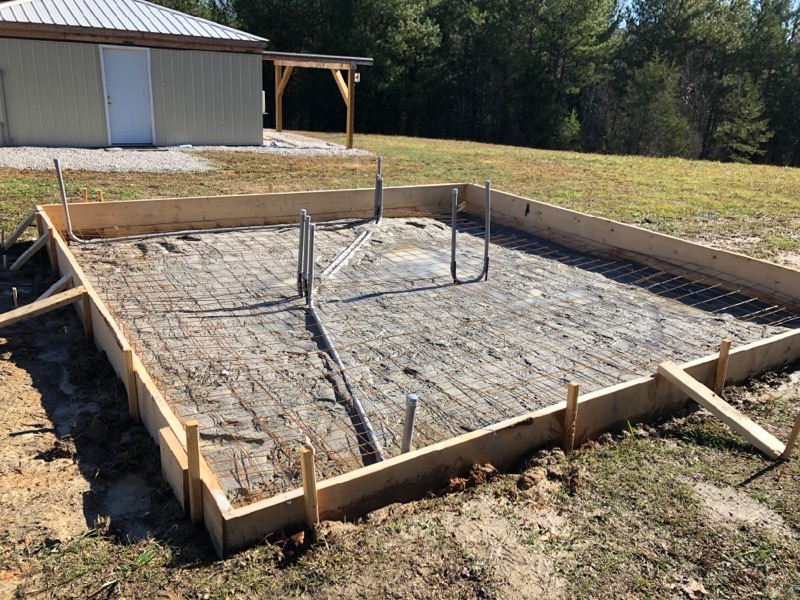
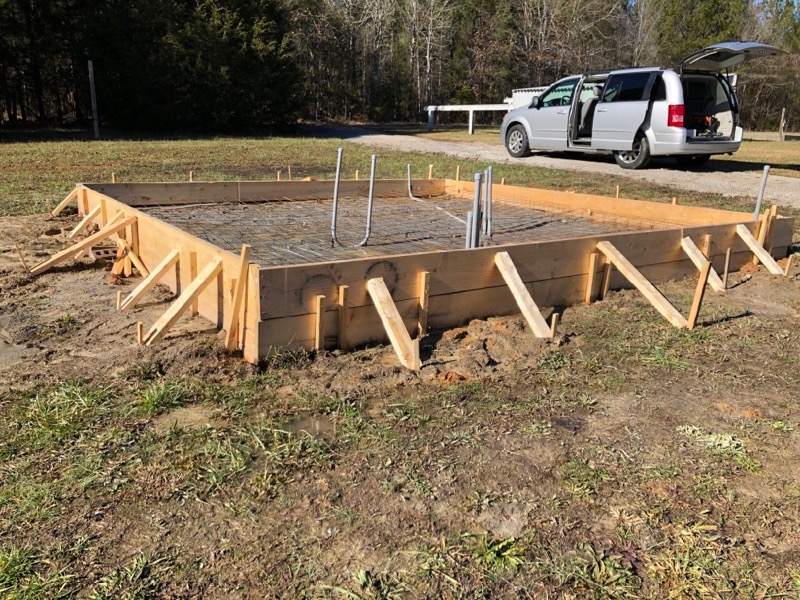
The plan for the day was to tamp down the gravel, add a couple more runs of conduit for wiring, and lay the mesh grid for the concrete reinforcement. Turned out to be a great day– 60° with a clear blue sky. With music playing (Grateful Dead, Dave’s Picks 28) to help pass the time, I got to work.
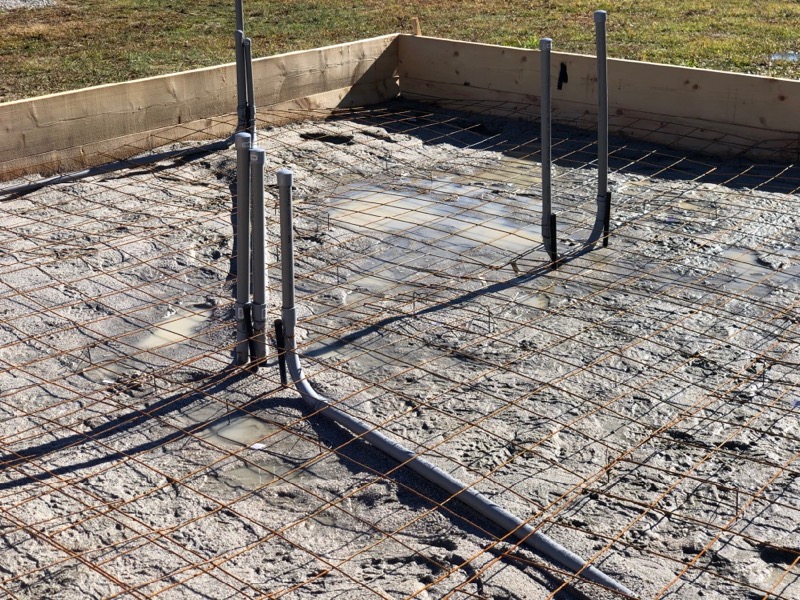
The first part of the plan, the tamping, didn’t go so well. It was more like stirring a bowl of mush- quite a bit of water was still trapped in there, so I moved on to the other chores. I laid out two more conduit paths - one from the warm room to the northeast corner, for a future rain sensor (and potentially an all-sky camera), and another run just under the warm room wall, just in case.
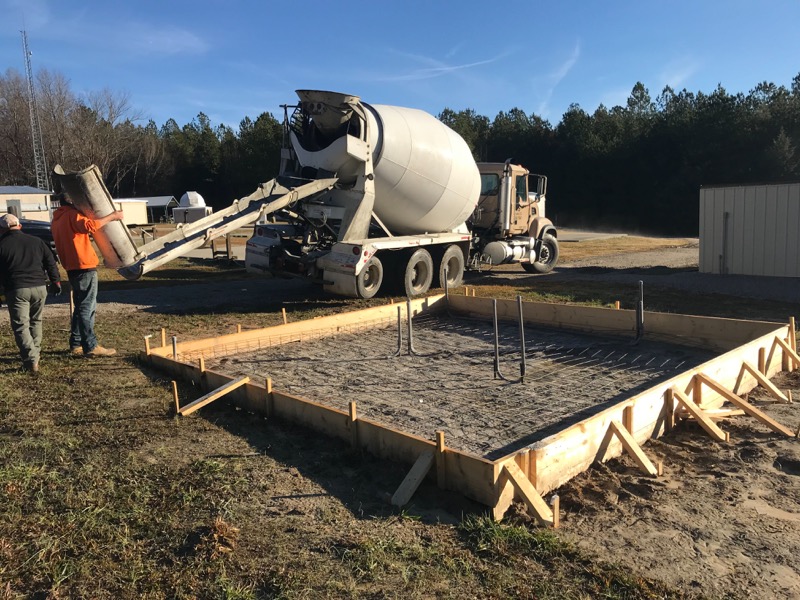
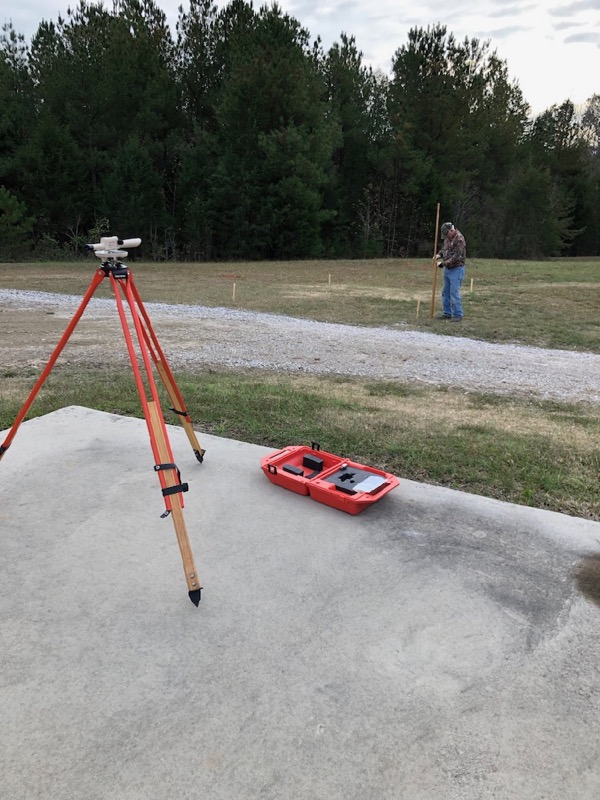
After lunch I met with Timmy, who specializes in concrete finishing. He will oversee the pour, smooth it out, and cut in stress relief after it sets up.
Finally, the pour
I wasn’t able to be there when they poured, but luckily Jim was. Hiring Timmy to oversee it took a lot of stress out of the process - He was able to check my work, take care of ordering the concrete, and get it all level & smooth. Jim even sent a picture!

Some other pics
Of course, I took a few other pictures along the way. Click on an image for a captioned slideshow…